Archive
TrueCrypt – Open Source Security
Overview
TrueCrypt is a very useful program. It allows you to encrypt your data either by encrypting your whole partition/hard drive, or by creating a file which is mounted as a virtual drive. I usually prefer the latter option, where I create a file of a certain size and then have it mounted to somewhere in my home directory. Everything private/personal would then be stored inside this directory, which results in it being encrypted. I would then be prompted at boot time for a password, which is needed to have this file decrypted and the directory become available.
I have a second smaller encrypted file which I also carry around on my pendrive, along with a TrueCrypt installation for both Windows and Linux. This second file contains some data like my private keys, certificates, passwords and other information I might need on the road.
Encrypting your Data
When you create your encrypted drive you are given the option of many crypto and hash algorithms and combinations of these. Each option has it’s own strength and speed, so with this selection you can decide on a balance between performance and security. On top of this you can also select the filesystem you wish to format the drive with, and when it comes time to formatting the drive you can improve the security of the initialization by supplying true randomness in the form of moving your mouse randomly. Some argue this isn’t true randomness or doesn’t have real value to the security, though I believe it’s certainly better than relying completely on the pseudo random generator algorithm, and most of all gives the feeling of security, which is just as important as having security. At this level of encryption the feeling of security is probably good enough, since the real security is already so high.
Passwords and Key Files
As far is password selection goes TrueCrypt encourages you to select a password of at least 20 characters and has the option of specifying one or more key files together with your password. A key file is a file you select from storage. It can be seen as increasing the length of your password with the contents of these files. For example, if you select a key file to be the executable file of your calculator program, then the contents of this file will be used together with your password to protect your data. You can also have TrueCrypt generate a key file of selected length for you. The key files can be of any size, though TrueCrypt will only use the first megabyte of data.
So when you mount the drive you not only have to supply the password, but also select all of the key files in the same order as it was configured. This can significantly improve security, especially if the key file is stored on a physical device like a security token or smart card. In this case to decrypt the volume, you need to (on top of the password) have knowledge that a token is needed, the physical token itself as well as it’s PIN.
The downside of key files are that if you loose the key file it would be very difficult to recover your data. If you select something like a file from your operating system and an update causes that file to change, then you will only be able to mount the drive if you get hold of that exact version of the file. So when using key files you need to be very careful in selecting files you won’t be likely to loose or which won’t be changed without you expecting it to change. Also, selecting key files it’s also important to not select ones which will be obvious to an attacker. For example, don’t select a key file named “keyfile.txt” which is in the same directory as the encrypted volume.
The better option is probably to have TrueCrypt generate the key file for you, and then use physical methods like a security token with a PIN to protect it. The benefit of security tokens used in this way can be visualized as having a password, but only those who have the correct token are allowed to use the password. So even if someone discovers the password they are unable to use it. And even if the token is stolen, without having the password it can not be used.
Hidden Volumes
TrueCrypt also has a function called a hidden volume, which is a form of steganography. This is where your encrypted container file, partition or hard drive contains a secret volume inside of it. So you end up having 2 passwords for your volume. If you try and mount this volume with the first (decoy) password, it would mount the outer or decoy volume. If you enter the 2nd (true) password it would mount the true or hidden volume. It’s possible to store data in both these volumes, which if done well will not give away the fact that the first volume is a decoy.
The benefit here is that if you are forced to hand over your password, you can give the password for the outer volume and thus not have anything you wish to remain private become exposed. With whole disk encryption you can even go as far as installing an operating system in both volumes, resulting in a hidden operating system altogether. So if you were to enter the hidden volume’s password you would boot into the installation of the hidden volume, and if you were to enter the outer volume’s password you would boot into the decoy operating system.
There is no way to determine whether a hidden volume exists within a particular TrueCrypt file/disk, not even when the decoy or outer volume is mounted or decoy operating system is booted. The only way to know this or mount it is to know the hidden volume’s password.
Conclusion
The primary reasons I like TrueCrypt so much is that it makes it easy for anyone to protect their data, giving you many choices in doing so and allowing you to choose the balance between security and performance. And when it gives you options for security it gives you options to have a decent amount of it (key files and hidden volumes). TrueCrypt is also very easy to install and integrates well with the environment. For certain tasks it needs administrator permissions, and on Linux many programs require you to run them as root if they need such access. TrueCrypt was implemented well enough to ask you for the administrator access when it needs to have it. It also allows mounting on startup to be easily achieved. It’s all these small things which make your life easier.
I would recommend TrueCrypt to everyone. Store all your sensitive data in a TrueCrypt drive because you never know what might happen to it. You always have the choice of using your operating system’s native data encryption functionality. Though TrueCrypt certainly has more features and makes all of them easily accessible and maintainable. It’s GUI is also easy to use, and more advanced functionality like mount options is available when/where it’s needed.
To download or find out more, see http://www.truecrypt.org/.
So Why Love Linux? Because it has had a strong influence on the open source movement, resulting in high quality open source software like TrueCrypt.
[13 Jul 2014 EDIT: with the recent events with TrueCrypt I would probably think I was making assumptions when writing this… LOL]
Building from Source Has Never Been Easier
Overview
For me, one of the greatest things Debian gave to the world was apt and dpkg, ie. Debian’s package management system. It does a brilliant job of almost everything and is very easy to use. What I’ll be explaining in this post is how you would use these tools to customize a package at the source level.
If you wanted to change something in the source code of a package, you could always go check it out from the project’s revision control system, or download it from the project’s web site. Though this won’t necessarily be the same version you received through the repositories, and will most probably not have all the patches applied by the distribution’s authors.
There are benefits in getting the latest vanilla version, though there are more cons than pros when compared to using apt and dpkg to get and build the source. Provided one is available, some of the benefits of using the source package from the repositories are:
- The source code you will be editing will be for the same version as the package you have installed.
- The source will have all the patches as applied by the distribution’s authors. Some of these patches are sometimes extra functionality which would be lost if you use the vanilla source code.
- The package version and patches from the distribution is what was tested within that environment.
- You are building a .deb package file, which can be installed and/or added to a repository to easily use on multiple installations
- When using a .deb file you can benefit from the dependency management
- Having a .deb you can control how new versions of the package are handled (like preventing new installations, safely overriding with new versions, etc.)
- By having a .deb it’s easy to remove the package and install the original again
Points 4 to 7 are also possible to achieve when downloading the vanilla source, though requires many more steps and is far more complicated than the technique I’m describing in this post.
Above all of these benefits, the biggest reason of all why I like to follow this approach when hacking the source of packages from my installations, is definitely the simplicity of it. When summarized, it all comes down to 3 commands I’ll list in the conclusion of this post.
Getting the Source
Before you can start building you need to prepare your environment for it. Run the following command to install the necessary packages:
quintin:~$ sudo apt-get install build-essential fakeroot dpkg-dev
So, for all the examples I’ll be using blueproximity as the package to be built. It’s a python script, so you don’t really need to download separate source code to modify it. Though to demonstrate this technique I figured it’s a good candidate given it’s small size and simple structure.
So to get the source, I’ll make a directory called src and change into it.
quintin:~$ mkdir src
quintin:~$ cd src/
Then instruct apt to download the source code for the project named blueproximity.
quintin:~/src$ apt-get source blueproximity
Reading package lists... Done
Building dependency tree
Reading state information... Done
Need to get 309kB of source archives.
Get:1 http://repo/ubuntu/ lucid/universe blueproximity 1.2.5-4 (dsc) [1,377B]
Get:2 http://repo/ubuntu/ lucid/universe blueproximity 1.2.5-4 (tar) [301kB]
Get:3 http://repo/ubuntu/ lucid/universe blueproximity 1.2.5-4 (diff) [6,857B]
Fetched 309kB in 9s (32.6kB/s)
gpgv: Signature made Mon 24 Aug 2009 00:52:04 SAST using DSA key ID 7ADF9466
gpgv: Can't check signature: public key not found
dpkg-source: warning: failed to verify signature on ./blueproximity_1.2.5-4.dsc
dpkg-source: info: extracting blueproximity in blueproximity-1.2.5
dpkg-source: info: unpacking blueproximity_1.2.5.orig.tar.gz
dpkg-source: info: applying blueproximity_1.2.5-4.diff.gz
As you can see, apt
- Downloaded the source tarball blueproximity-1.2.5.orig.tar.gz
- Downloaded a patch file blueproximity_1.2.5-4.diff.gz.
- It extracted the source code into a directory blueproximity-1.2.5.
- And then applied the patch to this directory.
At this stage the source is ready for editing.
Building the Source
In order for your build to complete successfully you might need some development dependencies. These are usually the header files or link libraries, and often named after the package with a -dev suffix. Apt can install anything needed to build a specific package using the build-dep command.
To make sure we have all these dependencies for building blueproximity, we run:
quintin:~/src$ sudo apt-get build-dep blueproximity
Reading package lists... Done
Building dependency tree
Reading state information... Done
0 upgraded, 0 newly installed, 0 to remove and 0 not upgraded.
In my case these wasn’t any build dependencies needed, and thus nothing was installed.
Once you’re happy with your changes and want to build the .deb file, you simply need to
- Change into the root of the extracted project source code
quintin:~/src$ cd blueproximity-1.2.5
- And run the build.
quintin:~/src/blueproximity-1.2.5$ dpkg-buildpackage -rfakeroot -uc -b
[truncated output]
dpkg-deb: building package `blueproximity'
in `../blueproximity_1.2.5-4_all.deb'.
dpkg-deb: warning: ignoring 1 warnings about the control file(s)

dpkg-genchanges -b >../blueproximity_1.2.5-4_i386.changes
dpkg-genchanges: binary-only upload - not including any source code
dpkg-buildpackage: binary only upload (no source included)
You’ll see a lot of output which I truncated here. The result will be one or more .deb files in the directory where you downloaded the source (in the example, the one named src).
Conclusion
As you can see, there is very little needed to get a package’s source code and build a .deb from it. I’ve done this a few times, and all the packages I’ve modified I’ve added to a repository of my own, and have found this approach to work very well for integrating my changes into the existing system as seamlessly as possible.
There are basically 3 commands needed to build a package from source (excluding setting up your environment for this). These are:
apt-get source [package name]
apt-get build-dep [package name]
dpkg-buildpackage -rfakeroot -uc -b
The first 2 commands you would run in a dedicated directory created for this purpose. The first command will then create a sub directory where it extracts the source code to. It’s in this sub directory where you would run the last command. The first 2 commands you would also only need to run once. The last command you can run each time you want to build a package from the same source code, perhaps when making changes for a second or third time.
It’s really that simple.
So Why Love Linux? Because apt opens up a very easy way of customizing your system at as low a level as the source code.
The Traveling Network Manager
Overview
Networks are such a big part of our lives these days that being at a place where there isn’t some form of a computer network, it feels like something’s off or missing, or like it wasn’t done well. You notice this especially when you travel around with a device capable of joining WiFi networks, like a smartphone, tablet or laptop. And even more so when you depend on these to get internet access.
Ubuntu, and I assume most modern desktop distributions, come with a utility called NetworkManager. It’s this utility’s job to join you to networks and manage these connections. It was designed to make best attempt to configure a network for you automatically with as little user interaction as possible. Even when using the GUI components, all input fields and configuration UIs were designed to make managing your networks as painless as possible, keeping in mind the average user’s abilities. All complicated setup options were completely removed, so you can’t configure things like multiple IP addresses, or select the WiFi channel, etc.
NetworkManager is mostly used through an icon in the system tray. Clicking this icon brings up a list of all available networks. If you select a network, NetworkManager will attempt to connect to the network and configure for your device via DHCP. If it needs any more information from you (like for a WiFi pass phrase or SIM card pin code), it will prompt you. If this connection becomes available in the future it will then automatically try and connect to it. For WiFi connections it’s the user’s job to select the first connection from the menu. For ethernet networks NetworkManager will automatically connect the first time.
These automatic actions NetworkManager takes are to make things more comfortable for the end user. The more advanced user can always go and disable or fine tune these as needed. For example to disable automatically connecting to a certain network, or setting a static IP address on a connection.
Roaming Profiles
If you travel around a lot you end up with many different network “profiles”. Each location where you join a network will have it’s own setup. If all these locations have DHCP you rarely need to perform any manual configuration to join the network. You do get the odd location, though, where you need some specific configuration like a static IP address. NetworkManager makes this and roaming very easy and natural to implement, and seamlessly manages this “profile” for you.
You would do this by first joining the network. Once connected, and whether or not your were given an IP address, you would open the NetworkManager connections dialog and locate the connection for the network you just joined. From here you would edit it and set your static IP address (or some other configuration option) and save the connection.
By doing this you effectively created your roaming profile for this network. None of your other connections will be affected, so whenever you join any of your other networks, they will still be working as they did previously, and the new network will have it’s own specific configuration.
This was never really intended to be a roaming profile manager, so other options related to roaming (like proxy servers) will not be configured automatically. I’m sure with a few scripts and a bit of hacking you should be able to automate setting up these configurations depending on the network you’re joining.
Conclusion
NetworkManager is maybe not the advanced user’s favorite tool. But if you don’t need any of these advanced features I would certainly recommend it.
So Why Love Linux? Because NetworkManager does a brilliant job of making networking comfortable in a very natural way.
Within the Blue Proximity
Overview
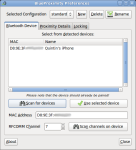
I read about the awesome little program called Blue Proximity. It’s a Python script that repeatedly measures the signal strength from a selected Bluetooth device. It then uses this knowledge to lock your computer if you are further away from it, and unlock it or keep it unlocked when you are close to it.
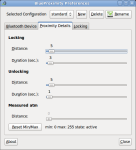
It’s very simple to setup. It has a little GUI from which you select which device you want to use for this and then specify the distance value at which to lock/unlock your computer, as well as which time delay for the lock/unlock process. The distance can’t be measured in meters/feet, but instead just a generic unit. This unit is an 8bit signed scale based on the signal strength measured from the device and isn’t terribly accurate. It’s not a perfect science and a lot of factors affect the reading.
So the general idea is that you try and get your environment as normal as you would usually have it and try different values for lock/unlock distances until you get a configuration that works best for you. There are a few more advanced parameters to play with as well. Especially the very useful ring buffer size, which allows you to effectively average that value over the last few readings, instead of using the raw value each time. It’s certainly worth playing around with these values until you find what gives you the best result.
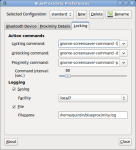
You can even go as far as specifying the commands to be executed for locking/unlocking the screen. The default is probably sufficient for most purposes, but it’s definitely available for those that want to run other commands.
Beyond just locking/unlocking there is also a proximity command feature, which will ensure that the computer doesn’t lock from inactivity as long as you’re close to it. This is very useful for times where you’re watching a movie or presentation and don’t want the screen to keep locking just because you didn’t move the mouse or type on the keyboard.
My Setup
Before I had this program I would have my computer lock after a 10 minute idle period. Then if I return it would almost be automatic for me to start typing my password. The Gnome lock screen is optimized cleverly, in that you can simply start typing your password even if the password dialog doesn’t display yet. It will recognize the first key press in a locked state as an indication of your intent to unlock the screen as well as use it for the first character of your password.
After I configured and hacked Blue Proximity to my liking the screen would lock as soon as I’m about 3 meters away from the computer, and unlock when I’m right in front of it. I configured a 10 second ring buffer to average the reading it gives over the readings for the past 10 seconds. I also made 0 or higher values (closest reading to the computer) count as double entries. Meaning when 0 values are being read it will average down to 0 twice as fast. This allows for it to be more stable when moving around, but unlock very quickly when standing right next to the machine. It all works very well.
It’s been a few days now, and still when I get to the computer and it unlocks by itself I’m amused. Sometimes I even start getting ready to enter my unlock password when the screen is automatically unlocked. Very amusing.
It’s not perfect, and sometimes the screen would lock while I’m busy using the computer and then immediately unlock again. This is to be expected from the nature of wireless technologies, though I’m sure a bit more hacking and tuning will get it at least as close to perfect as it can be.
Conclusion
It’s typical of the software world to always produce amusing and fun utilities like this one. This one is definitely one of my favorites.
So Why Love Linux? Because there are tons of free and open source programs and utilities of all kinds.

Managed Packages
There are tons and tons of open source projects out there. Something for almost every topic or task. From general purpose, common or popular down to highly specialized or unheard of software. This is one of Linux’s strengths, especially with distributions like Ubuntu which have package repositories with thousands of options readily available to the user.
Package Manager
Synaptic Package Manager is Ubuntu’s user interface to the underlying apt package management system. Whenever I want to install something I would first go check if I can’t find it in Synaptic before I go look to download it manually. More often than not I would find the package in Synaptic, and can have it then installed with just 2 more clicks of the mouse.
This saves a lot of time, and never goes unappreciated.
Ubuntu Repositories
The package management software for Ubuntu is brilliant. But without thorough repositories they’re nothing more than just that, package management.
Ubuntu has multiple levels of repositories by default, nl. main, universe, multiverse and restricted.
- The main repository is maintained by, and contains software officially supported by Canonicle themselves.
- The universe repository is maintained by the community and isn’t officially supported by Canonicle.
- The restricted repository contains packages that isn’t available under a completely free license. A popular example is for proprietary drivers, like the Nvidia or ATI graphics drivers.
- The multiverse repository contain software that isn’t free.
Canonicle is doing a great job with the main repository, having a decent variety of packages available and kept up to date. On top of this the community is doing a fantastic job to keep the universe repository filled up. With these two I rarely have the need to go looking for software on the internet.
Easy Repository Integration
For the few cases where the default repositories don’t have what you need, you need to get it from the internet.
There are a few ways to install packages from the internet.
- Download an installer and run it.
- Download an archive and either build from source or install it some manual way.
- Download a .deb package and install via dpkg.
- Add a 3rd party repository to your package management system and then install via Synaptic.
The Ubuntu system makes it very easy to add a 3rd party repository. This means that if you come across a site that offers an Ubuntu (or apt) repository, it can usually come in the form of
- A string called an “APT line”, which you can just add using the supplied GUI in Synaptic Package Manager, or
- A .deb file which you install via dpkg. This will then set up the repository for you. You can usually just double click on the .deb and it will start up the installation for you.
After you’ve got their repository set up you can go into Synaptic, search for the package you want, and install it.
Standardized Maintenance and Management
One of the biggest benefits of installing packages via the repositories (other than it making your life easier), is that the program is now maintained by the package management system. This means that your system has a standardized way of
- Having on record what is installed and what files are owned by the package
- Reinstalling if files go missing or become corrupted
- Cleanly removing the package
- Finding and installing updates for the package.
For packages installed via other methods there is usually no uninstall or automated update support.
Some of the more advanced programs have built in support for this. But if you installed it into a shared location owned by root, you won’t be able to update. I usually get around this by temporarily changing the ownership of the directory, doing the update and restoring the ownership.
Exploring
With the large variety of packages available via the Ubuntu repositories, you have an endless number of programs to try out if you feel like exploring. I have had some of these moment where I just pick some random location and start reading the description of each package until I find something that pokes seems interesting. I will then install it, play around and return to the list to find another one.
It’s a very good way of learning about new programs and projects, and certainly an amusing exercise.
Conclusion
So Why Love Linux? Being the result of open source communities there are tons of projects out there and decent repositories and package management systems make these easily available.
CrossOver Office
Introduction
I have to admit, this is an odd post. It explains a reason to love Linux, being that it runs CrossOver Office, which allows you to run Windows software on Linux with little problems.
Either way, this says it all. Sometimes you just need to do it. I, personally, feel that Microsoft Office far exceeds the quality of OpenOffice. OpenOffice has a long way to go before it’s as easy to use and powerful as Microsoft Office is. So on all my Linux installations I run Office 2007 inside CrossOver Office.
How does CrossOver Office differ from Wine?
CrossOver Office is based on Wine. Though, being a commercial program that you can only use if you pay for it, there is funding to support certain programs’ compatibility. Wine works very well, though there are many visual glitches and bugs that make running certain programs a headache. And unless you’re a Wine expert you can’t always make these glitches go away.
The team at CrossOver office take popular programs and make compatibility fixes to ensure they run close to, if not as well as they do on Windows, making available this quality support to the general public.
I feel it’s worth every cent and recommend it to everyone installing Linux. Support the hard working team at CodeWeavers today!
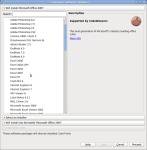
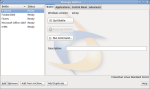
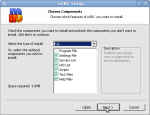
Screenshots
Here are some screenshots of my CrossOver installation. Just see how well these programs run on Linux:


Conclusion
So Why Love Linux? Because CrossOver office helps to bring the best of both worlds onto your desktop.
